
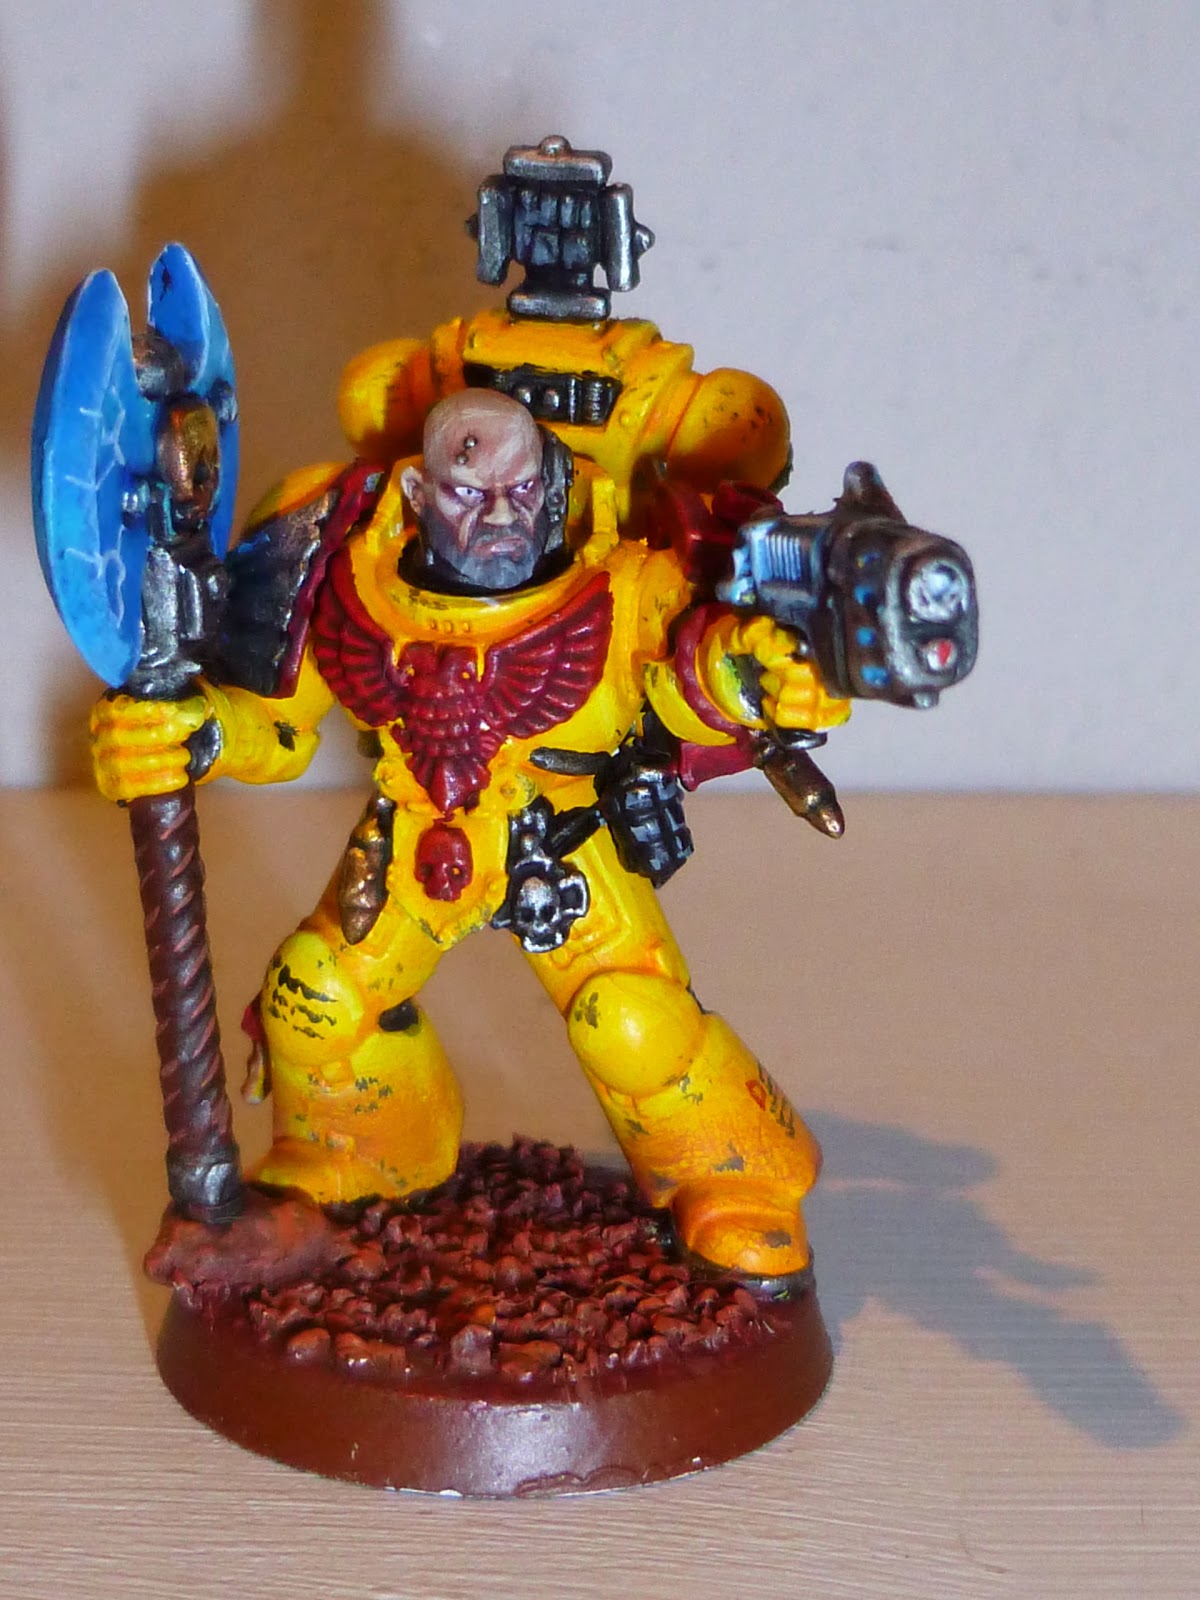
Seems appropriate after the Games Day reveal that my next painting guide will be Imperial Fists - 3rd company no less! This is quite a complex one but the results are awesome so please give it a try.
Paint list:
Ceramite white
Abaddon black
Khorne red
Balthazar gold
Leadbelcher
Caledor sky
Rakarth flesh
Whitescar
Yriel yellow
Flash gitz yellow
Evil sunz scarlet
Fire dragon bright
The fang
Fenrisian grey
Eshin grey
Dawnstone
Squig orange
Doombull brown
Runefang steel
Gehenna gold
Auric armour gold
Teclis blue
Lothern blue
Temple guard blue
Lamenters yellow
Nuln oil
Agrax earthshade
Druchii violet
Reikland fleshshade
Lahmium medium
Ardcoat
1 - Basecoating - by far the most important step in painting an imperial fist. My method relies on a white base coat. I cannot emphasise enough how important a good base coat is for this method, and so would recommend a thin layer of ceramite white, followed by spraying the model white, and then another layer of ceramite white making sure you cover everything. Preparation is key.

2 - Yellow armour - add a few thinned layers of yriel yellow to the model giving an even coat. Add some lahmium medium to fire dragon bright and wash it into the recesses of the armour - don't worry if it isn't precise. (note, the citadel yellow wash may be good for this step also) Next, go back over the armour with yriel yellow tidying any excess orange. Add highlights using flash gitz yellow, then a final line highlight using dorn yellow (or mix FG yellow 1:1 with whitescar as I did). Finally, glaze the armour with lamenters yellow.


3 - red parts - with the yellow dry, move onto the red areas. Khorne red as a basecoat, followed by evil sunz scarlet highlights and a wash of carroburg crimson. Retouch the ES scarlet highlights when dry.


4 - face - OPTIONAL - I basecoated the face with cadian fleshtone then washed it with reikland fleshshade. Once dry, I mixed some rakarth flesh 1:3 with cadian fleshtone and added a full layer except in the recesses. Then I increased the ratio of the rakarth flesh in the mix adding a highlight layer on the raised areas. This was repeated a couple of times until the ratio was 3:1. Next I painted the eyes with whitescar and pupils with abaddon black. A thin wash of druchii violet was added around the eyes. Finally, eshin grey was painted on the beard, highlighted with dawnstone.


5 - black areas - the most dangerous part so take your time and use appropriate sized brushes with the paint appropriately thinned. Mixing abaddon black 1:1 with nuln oil can be useful for a nice flowing mix. Paint the majority of the black area with a larger brush then switch to smaller for where it meets the yellow. If you do make a mistake you can always use ceramite white to correct it later. Abaddon black for the areas, then highlight with eshin grey and dawnstone. (except for leather pouches which were highlighted with the fang) This is also a good time to add script to the armour. (note, I've used the flash on one of the next pictures to help show the vibrance of the yellow)


6 - metallic areas. For silver, paint leadbelcher over the black and wash with nuln oil. Once dry, highlight with runefang steel. For balthasar gold, use gold the gehenna gold. Wash with agrax earthshade then highlight with auric armour gold when dry. Note, I basecoated the weapons and painted the base while waiting for coats to dry.


7 - other details - I painted the purity seals rakarth flesh then washed with seraphim sepia and highlighted with pallid wych flesh. The crux terminatus was painted eshin grey, washed with nuln oil, highlighted with dawnstone then washed with agrax earthshade.
8 - plasma pistol - with the majority of the model finished all that remains is to sort the plasma pistol. Basecoat with caledor sky, then progressively highlight with teclis blue, temple guard blue, lothern blue, fenrisian grey and whitescar. Try to catch the surronding edges for a glow effect.


9 - power weapon - I used the same colours as for the plasma pistol to keep the effect uniform. The idea is to blend the colours from darkest to lightest on one surface, then the opposite way on the adjoining surface. Best way to do this is to put a blob of each colour on your palette, then once you've added a colour, mix it 1:1 with the next colour before moving on. I always start with the darkest. For example you'd put some caledor sky at the base of the axe and top of the blade, then mix caledor sky and teclis blue for the next band of colour, then pure teclis blue and so forth. It takes time and practice but is a great effect to master. Once done, highlight the edges with a colour a few shades lighter than the section of the axe, so temple guard blue for the caledor sky section and so forth. Once done, wash with guilleman blue then touch up the highlights once dry. I add a few energy discharges in whitescar around the cables also. The haft is doombull brown washed with agrax earthshade and highlighted with squig orange.


10 - weathering - very simply, get a stippling brush and stipple eshin grey (wipe most off the brush first) at areas most likely to chip, such as the kneepads etc. As I use a martian base theme, I also simulate red dust on the lower parts by drybrushing on squig orange.


And that's it folks, all done. Give it a spray with matte varnish then use ardcoat on the power weapon and plasma pistol. Hope it's useful and any questions please ask. Cheers.


No comments:
Post a Comment